Making a Selective Purge Button
Someone asked if there were an easy way to purge some, but not all, unused items in their drawing. For instance they do not want to purge unused layers. They have prepopulated their architectural background with all the anticipated architectural layers and don't want lose them.
A previous purge tip shows how to selectively purge items with the Purge dialog; however, the user simply wants a button that will purge all unused Blocks, Linetypes, Mline styles, Plot styles, Shapes, Table styles, and Text styles but NOT the Layers or Dimension styles. It's a fair request, and it sounds like a good job for a Toolbar button macro or Tool Palette macro.
Welcome to CUI 101!
Type CUI at the command line to bring up the Customize User Interface dialog. We're going to work this dialog from the upper left down, then from upper right down.
In the "Customizations" section, set your CUI to Custom.cui, (this is so we don't modify or "mess up" the default ACAD.CUI). Select the Toolbars branch, right-click, and add a new toolbar named Utilities.

In the Command List section, use the New button to add a new command macro.
 Select the broom for the Button Image.

Use the Properties section to rename your new command macro to Selective Purge. Change the Macro to run the PURGE command with desired responses:
^C^CMULTIPLE;-PURGE;B;*;N;LT;*;N;P;*;N;SH;*;N;ST;*;N;M;*;N;T;*;N;R;*;N;^C
Does this look like gobbledygook? We need to use the command line version of PURGE to be able to place the command and responses into a macro. Let's dissect this macro: The ^C^C represents two Escapes (this gets us out of whatever command might be active when we click on the button). Then we run the MULTIPLE command to repeat the next command, -PURGE (command line version), until canceled. The semi-colons act as Enters. Then use B for Block, * for all, and answer the prompt to verify each item to be purged with N for No. Then we do the same sequence for LT (Linetypes), P (Plotstyles), SH (Shapes), ST (Text Styles), M (Multiline Styles), and finally R (Registered applications). The last ^C (Esc) cancels the MULTIPLE command.
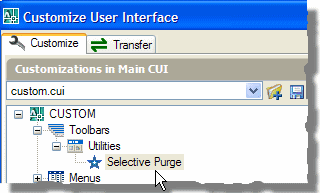
The last step is to drag our new command onto our new toolbar. Select the Selective Purge command from the Command List and drag it up to the Utilities toolbar in the Customizations tree (clumsily illustrated above).
Now that we have a Toolbar with a Selective Purge command, you can also drop the new command onto a Tool Palette. Make sure that your new Toolbar is displayed and open your Tool Palette window (Ctrl+3). Right-click the title bar of the tool palette and click Customize Palettes... Now drag the button from the toolbar to the desired palette. The black horizontal line indicates where the command will be placed. Close the Customize dialog.


0 Comments:
Post a Comment
Subscribe to Post Comments [Atom]
<< Home