Setting Hatch Boundary boundaries
Do you really want to do this?
This message might be displayed when placing a hatch pattern or when editing an element that forms the boundary of the hatch. What AutoCAD is really telling you is that it's about to perform some intensive analysis and might get really slow, or worse, crash. AutoCAD displays this message when it has to analyze over 1000 entities.
Most of us use the "flood fill" method to place hatches. When you pick points to determine your hatch boundary, glance down at the command line to see:
Pick internal point or [Select objects/remove Boundaries]: Selecting everything...
Selecting everything visible...
Analyzing the selected data...
Analyzing internal islands...
Note the second line, "Selecting everything visible," this means that AutoCAD is going to analyze everything currently visible on the screen to find a valid closed hatch boundary surrounding your pick point. This might include reference files and, if so, puts a huge burden on AutoCAD to examine every element in the references to determine whether it should be part of the hatch boundary. This doesn't mean that you cannot, or should not, use elements within reference files as part of your hatch boundary, just be aware of what you're asking AutoCAD to do.
Limiting your Boundary set
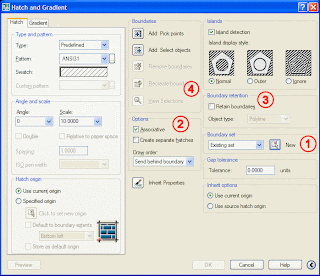
There's a little known tool on the Hatch dialog that helps you limit the boundary set that AutoCAD must analyze to find a boundary. Select the New button (1) and select only the entities you know will form part of the boundary. This allows you to exclude entities from consideration, or limit the analysis to only one reference. After creating a boundary set, use the Pick points method as you normally would to find the hatch boundary.
 Controlling associativity
 You can opt to make hatches associative or not with the Associative toggle in the Hatching dialog (2). This value is stored in the system variable HPASSOC. Associative hatch is tied to its boundary and is automatically recalculated and redrawn if the boundary, or elements of the boundary are moved.
You can disassociate an existing hatch by setting its Associative property to No in the Properties palette.
Knowing your boundaries
How can you tell what boundaries are associated with a given hatch pattern? Set your PICKSTYLE to 2 (or 3, it's typically 1) and then select the hatch. All the elements of the hatch's boundary are also selected. Be careful not to press the Del key at this point! And don't forget to return PICKSTYLE's value to 1 when you're finished examining your hatch boundaries.
Another little trick is to tell the Hatch to retain boundaries (3) once it's found them. This makes the association tied to the generated polyline or region and not to the elements analyzed to determine the boundary. You can even do this after the fact. Use the HATCHEDIT command to edit the existing hatch (this dialog is very similar to the HATCH dialog). Use the Recreate boundary button (4) to recreate the boundary and reassociate the existing hatch to it.


3 Comments:
very long winded. create a layer called hatchboundary, draw a polyline as your boundary and hatch this. just make sure the hatch boundary layer is set not to plot.
regarding the 1st post - I disagree. it's actually faster NOT creating a new layer and new entity to hatch a boundary... especially some of the complex boundaries I hatch.
the problem with doing it as the first anon commenter suggested is if you are hatching something curved or want the hatch to uniformly cover a line, there is no quick way to do this with polyline/line command. it would take a long time. the way the article describes sounds like it will be faster than attempting to draw a hatch boundary w/ pline around a line. thanks for the directions - i will test it out.
Post a Comment
Subscribe to Post Comments [Atom]
<< Home