I'm often asked how does AutoCAD find and resolve external references, Xrefs? This tip (well a little more than a tip I'm afraid) will attempt to answer that question. Are you all sitting comfortably? Then let's begin.
AutoCAD searches for Xrefs in the following locations, in order, until it finds the external file:
- The location specified in the Xref dialog,
- The same folder as the current drawing,
- The folders specified by PROJECTNAME,
- The folders that make up the library path,
- The current folder (the folder from which AutoCAD was started).
So let's cover each of these possibilities in a little more depth:
1. Specified Location
There are three ways to specify the Xref's location in the Xref dialog: Full Path, Relative Path, and No Path. Full path tells AutoCAD exactly where to look; e.g. P:\Proj\CAD\A\Det.
Relative Path gives AutoCAD a partial folder structure that is relative to the current drawing location. Let's say that your current drawing is in folder P:\Proj\CAD\A, then:
| Xref location | Relative Path | What is happening |
| P:\Proj\CAD\xref.dwg | ..\xref.dwg | ACAD looks back one folder from the current drawing folder (..\ means back up one folder) |
| P:\Proj\CAD\A\Det\xref.dwg | .\Det\xref.dwg
or
Det\xref.dwg | ACAD looks forward into Det from the current drawing folder (.\ means start from the current folder, or simply leave this off and the current folder is assumed) |
| P:\Proj\CAD\S\Det\xref.dwg | ..\S\Det\xref.dwg | ACAD backs up one folder to CAD, then goes forward into S\Det |
Compare the Saved Path to the Found At path in the Xref palette to see if you're getting expected results.
 2. The Current Drawing's Folder
If AutoCAD cannot find the Xref in the specified or relative folder, or the Xref was attached with the No Path option, AutoCAD next looks in the current drawing's folder for the reference file.
3. PROJECTNAME
If AutoCAD fails to find the Xref in the specified folder, relative folder, or the current drawing's folder, then it searches the folders specified by the drawing's PROJECTNAME system variable.
Use
Options > Files > Project Files Search Path to create projects. Let's say you create a project 6250620000 and add to it multiple folders. When you set a drawing's PROJECTNAME variable to 625062000 that drawing will search those specified folders, in order, when resolving references. Drawing's that have other values for PROJECTNAME will look in that project's folders.
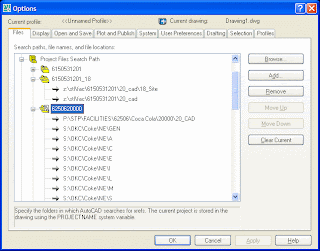
Whereas the value of the PROJECTNAME variable is stored in the drawing, the Project folders are stored in the user's registry. So, if you use this method to create search paths for your references, make sure that you set up the Projects the same way on every workstation.
4. Library Path
This is the list of folders specified in Options > Files > Support File Search Path. These folders are typically the program folders for AutoCAD itself, but you can add your own folders too. Many Benham offices use an environment variable in this location, then start AutoCAD with a specific project start up batch file that, among other things, specifies folders for this variable. Clever huh?
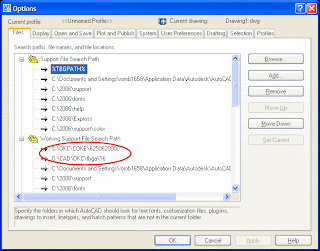
In this example the TBGPATH variable is set to two folders. You can see that the variable does in fact resolve to the desired folders by comparing the Support File Search Path to the Working Support File Support Path, which is the path that AutoCAD is actually using for the session.
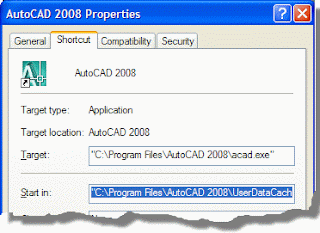
5. The Current Folder
The last place AutoCAD looks for Xrefs is in the current folder, the folder from which you started AutoCAD. This folder is specified by the
Start in folder of the shortcut. Project start up batch files can also be used to set the current folder.
If you make it a practice to keep all reference files in one folder, and start AutoCAD from that folder, then no matter what folder your sheets are in, or where the current drawing thinks its references are (specified path, relative path or project name), AutoCAD will still be able to resolve the references
.
Let's Sum Up
So, which method is best? The answer depends a great deal on your needs. The easiest way is to simply use explicit paths. However, this is less than ideal when sending the files to clients, moving from drive to drive, changing the name of the root folder, etc. Using Relative paths is almost as easy and circumvents most of the problems above. Or, use the No Path option and let the start up batch file or project shortcut control the search locations for you.
 Use the Attribute tab to change the value of an Attribute. Use the Text Options and Properties tabs to change: Text style, Justification, Height, Width Factor, Oblique Angle, Layer, Color, Lineweight, etc.
 Global editing of Attribute values can still be accomplished with the old, tried and true, -ATTEDIT command. Don't forget the dash; ATTEDIT alone invokes the older (non-Enhanced) Attribute Editor dialog. The -ATTEDIT command exists virtually unchanged since the very early days of AutoCAD, so the syntax is a bit clunky, but it will allow you to replace all or part of an existing Attribute value on all or selected Blocks. -ATTEDIT will also edit other Attribute properties beside value, but one by one, not on a global basis.


