Tuesday, May 29, 2007

Explode Text

Have you ever seen your company logo, client logo, or other specific text rendered with an unexpected font? Here's what's happening: You've selected a particular text font for your purpose, but the end user, recipient, or whomever, does not have that font loaded on their workstation so AutoCAD is substituting another font in its place.

Here's a cheat to ensure that your logo is never rendered incorrectly. Convert it to geometry with the Express Tool TXTEXP. This tool explodes Text or Mtext into closed polylines suitable for hatching. It can be found under Express > Text > Explode text.

The image above shows a line of text with an unusual font and the same text exploded with TXTEXP. The next step would be to Hatch the resultant polylines with a solid fill pattern. Now you have geometry that will always display and plot as expected.

Wednesday, May 23, 2007

AutoCAD Selection Techniques

Most editing commands issue the standard Select objects: prompt and you then click on every object you want to add to a selection set. You can enter modifiers at the Select objects: prompt to change the way objects are selected.

W
select by Window
C
select by Crossing window
P
reuse the Previous selection set
L
select the Last entity drawn
F
select by Fence
WP
select by Window Polygon
CP
select by Crossing window Polygon
All (Ctrl-A)
select All
A
add objects mode
R
remove objects mode


Using Window, objects must lie completely within the window boundary to be selected. Contrast that with Crossing window where objects within the window or crossed by the boundary are selected. Fence selects all objects crossed by a line. Window and Crossing Polygons behave like Window and Crossing but their boundaries can be a polygonal shape and not a mere rectangle. Previous lets you reselect your previous selection set; very handy. And Last selects the last object drawn from the objects currently visible. If you select everything, bear in mind that objects on Frozen layers are ignored and therefore not selected, whereas objects on layers that are Off are selected. This is one of the differences between Off and Frozen.

If you miss when picking an object AutoCAD assumes that you're going to select by Window or Crossing and the pick point becomes the first corner of the Window or Crossing. As you drag to the right notice that your boundary is solid indicating that your going to select via Window. But if you drag to the left, your boundary is dashed indicating that you're selecting with Crossing.

If you want to remove objects from your selection you can issue the R modifier and subsequent selected objects, using any of the methods above, are removed from the current selection set. Use the A modifier to return to add objects mode. Bonus Tip: you can temporarily enter remove objects mode by holding down the Shift key while selecting.

In AutoCAD 2006 you can cycle thru objects that lie atop one another by holding down the Ctrl key as you're selecting. This has changed for AutoCAD 2007 and up: now you Shift-Spacebar as you roll-over the object to "pre-highlight it" before actually picking it (Ctrl-Spacebar for subobjects: faces, edges, vertices). Of course this only works if your roll-over highlighting is On. This setting is controlled in the Selection Preview area of the Selection tab in Options.

Use the Visual Effects Settings..., Advanced Options... to exclude various objects: Xrefs, Hatches, etc. from roll-over highlighting.

While we're here, let's go over a few of the Selection Modes.

  • "Noun/verb selection" allows you to select objects first then run the command.
  • "Shift to add" will really mess you up. Turn this on to annoy your friends.
  • "Press and drag" makes window selection act like Microsoft Windows (pick-drag to corner) rather than classic AutoCAD (pick-pick)
  • "Implied windowing" must be on if you want pick-miss to imply a window/crossing selection, otherwise pick-miss just misses.

Select by Property

And for extra added selection power don't forget the QSELECT command. Is anyone interested in a tip on the FILTER command?

Tuesday, May 15, 2007

Use Design Review as an Acrobat replacement

Have you ever found yourself wishing for a full seat of Acrobat so you could create your own PDF documents, and have the ability to insert, remove, or reorder pages, but you don't want to spend the $500 plus that Adobe wants for this application? Try creating and editing your documents as DWF files first and only taking it to PDF right at the end.

Here's what you'll need:

  1. The Autodesk DWF Writer for printing DWF files from Office or non-Autodesk applications, and
  2. Autodesk Design Review for editing the DWFs
  3. Some way to print to PDF at the end

Both of the Autodesk products are available free and can be downloaded from the Autodesk website. There are many inexpensive system printers that can be downloaded from the internet that can output to PDF. I use PDF995.

The Autodesk DWF Writer installs as a printer on your system. Use this printer to print your non-Autodesk documents to DWF format. When the Autodesk DWF Writer printer is installed on your system, it creates toolbars in your Office applications to make writing DWFs easy.

To create DWFs from AutoCAD drawings, either:
  • Plot to the DWF6 ePlot plotter
  • Choose the DWF option from the Publish dialog,
  • Or use the Publish to DWF option from the Sheet Set Manager.

Open all the resultant DWFs using multiple sessions of Design Review. Here you can:

  • Drag pages from file to file to combine DWFs
  • Reorder pages by dragging them around in the Contents palette
  • Rename pages
  • Delete/replace pages

And finally, print your DWF from Design Review to PDF format using your PDF Windows printer driver of choice. Choose All for the Print Range. Check Choose paper source by DWF page size. And, set Scale to 100%, Clip Pages, and Center on Paper. The resultant PDF should look just like your DWF document and may contain mixed page sizes and layout orientations.

Tuesday, May 08, 2007

Delete Layer

Layers: we all use them, need them, love them, and hate them; especially when we can't get rid of a persistent layer. If Purge won't remove an unwanted layer here, are some heavy handed tools that will.

LAYDEL

The Layer Delete command, LAYDEL, started life as an Express Tool and has become part of the core AutoCAD package beginning with version 2007. This command prompts you to select an entity on the layer to delete, or you can enter/select the layer name. The unwanted layer is then stripped from the drawing including everything that might reside on this layer. A powerful and dangerous command; use with care.

LAYTRANS

Just as effective, this command, also a former Express Tool, translates a selected layer and its contents to another layer, removing the source layer from the drawing. This is a bit safer than LAYDEL in that you won't lose items tied to the source layer, they just get moved to the target layer.In the Layer Translator, select the unwanted layer in the "Translate From" pane. Then either Load the layer you wish to "Translate To" from an existing drawing or drawing standards file (you may even select the current drawing), or select New and create a layer. In the example above I'm creating a new layer 0. (Important: since this layer already exists in my drawing, the existing layer will be updated to the new properties.) Click the Map button to establish the mapping, and click Translate. Now examine the Layer dialog; got G-ANNO-MILK?

Both of these commands are powerful enough to find the persistent layers no matter where they reside, even reaching into block definitions to find and remove/translate the unwanted layers.

Tuesday, May 01, 2007

Setting Hatch Boundary boundaries

Do you really want to do this?

This message might be displayed when placing a hatch pattern or when editing an element that forms the boundary of the hatch. What AutoCAD is really telling you is that it's about to perform some intensive analysis and might get really slow, or worse, crash. AutoCAD displays this message when it has to analyze over 1000 entities.

Most of us use the "flood fill" method to place hatches. When you pick points to determine your hatch boundary, glance down at the command line to see:

Pick internal point or [Select objects/remove Boundaries]: Selecting everything...
Selecting everything visible...
Analyzing the selected data...
Analyzing internal islands...

Note the second line, "Selecting everything visible," this means that AutoCAD is going to analyze everything currently visible on the screen to find a valid closed hatch boundary surrounding your pick point. This might include reference files and, if so, puts a huge burden on AutoCAD to examine every element in the references to determine whether it should be part of the hatch boundary. This doesn't mean that you cannot, or should not, use elements within reference files as part of your hatch boundary, just be aware of what you're asking AutoCAD to do.

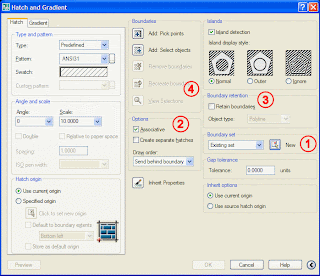
Limiting your Boundary set

There's a little known tool on the Hatch dialog that helps you limit the boundary set that AutoCAD must analyze to find a boundary. Select the New button (1) and select only the entities you know will form part of the boundary. This allows you to exclude entities from consideration, or limit the analysis to only one reference. After creating a boundary set, use the Pick points method as you normally would to find the hatch boundary.

Controlling associativity

You can opt to make hatches associative or not with the Associative toggle in the Hatching dialog (2). This value is stored in the system variable HPASSOC. Associative hatch is tied to its boundary and is automatically recalculated and redrawn if the boundary, or elements of the boundary are moved.

You can disassociate an existing hatch by setting its Associative property to No in the Properties palette.

Knowing your boundaries

How can you tell what boundaries are associated with a given hatch pattern? Set your PICKSTYLE to 2 (or 3, it's typically 1) and then select the hatch. All the elements of the hatch's boundary are also selected. Be careful not to press the Del key at this point! And don't forget to return PICKSTYLE's value to 1 when you're finished examining your hatch boundaries.

Another little trick is to tell the Hatch to retain boundaries (3) once it's found them. This makes the association tied to the generated polyline or region and not to the elements analyzed to determine the boundary. You can even do this after the fact. Use the HATCHEDIT command to edit the existing hatch (this dialog is very similar to the HATCH dialog). Use the Recreate boundary button (4) to recreate the boundary and reassociate the existing hatch to it.