Tuesday, June 26, 2007

Object Tracking

Object tracking in AutoCAD is a way to "harvest" existing geometry to draw new geometry using the point acquisition techniques discussed in last week's tip. The idea being that you don't need to create as many construction lines to help with laying out new geometry. (Who uses Rays anyway?) The best way I could figure to illustrate Object Tracking was by way of a few examples. These examples require that Object Tracking be On (depress OTRACK on the AutoCAD status bar, or toggle Otrack On/Off with F11), and that at least some Running Object Snaps are set and On (depress OSNAP on the status bar, or toggle with F3).

Track Relative To

You can use object tracking to draw relative to a given point:
  • Ensure that you have set a running object snap of at least Endpoint
  • Draw a rectangle
  • Restart the rectangle command
  • Hover over the lower right corner of the first rectangle to acquire its endpoint (don't pick yet)
  • Drag to the right, you should see a dotted object tracking line through the acquired point
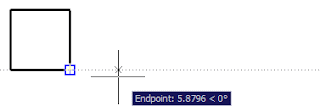
  • Pick to start your rectangle's first corner
  • Hover over the upper right corner of the first rectangle to acquire its endpoint (don't pick)
  • Drag to the right and pick to complete the second corner of the rectangle

You now have two rectangles whose lower and upper edges are at the same Y ordinates.

Find Imaginary Points

In this example we're going to draw a circle centered on an imaginary intersection.

  • Ensure that the Extension running object snap is set
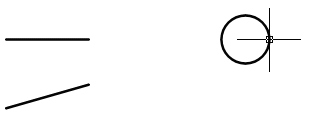
  • Draw two skewed lines as shown
  • Start the Circle command
  • Hover over the end of each line to acquire the endpoints (don't pick)
  • Drag to the right near to where the lines would intersect if they were longer

  • Once the the tracking lines appear you will be ready to snap to the imaginary intersection
  • Pick to place your center point, then complete your circle
Build new Coordinates from Existing Geometry

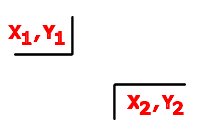
In this example we're going to combine the X ordinate from one acquired point with the Y ordinate from another acquired point to build a new coordinate pair.

  • Ensure that the Endpoint running object snap is set
  • Draw lines as shown
  • Start another draw command
  • Hover to acquire endpoints from both lines (don't pick)
  • Drag to find two different coordinates using the Xs and Ys of the acquired points, pick the desired one

Tuesday, June 19, 2007

New Object Snaps

There are a couple of new, well newish, object snaps available in AutoCAD. The Parallel object snap allows you to draw parallel to another object. The Extension object snap allows you to draw to a point in space that lies along where an object would be if it extended out that far. Using both of these newish object snaps requires picking up a new skill, or habit, called acquiring points.

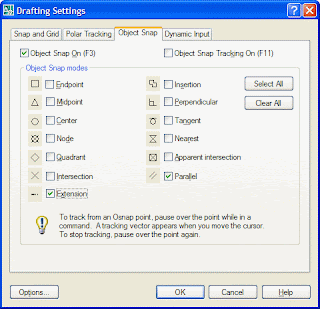
First turn on the two new running object snaps. Right-click the OSNAP button on the status bar, and choose Settings from the menu. Check the Extension and Parallel snap modes and make sure that Object Snap On is checked.

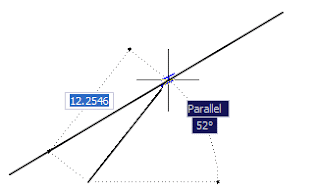
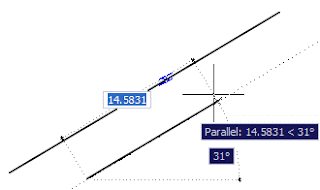
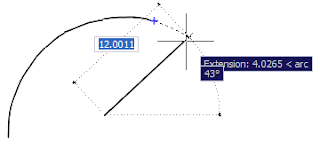
Draw a line in space. Start another line; pick a start point. Here's the new skill: Hover over the first line until you see the Parallel object snap marker appear. Don't pick! Now move your cursor away from the first line until you track parallel to it. A faint dotted line appears when you're tracking parallel. Pick your second point to complete the parallel line.Using the Extension object snap is similar. For this example, draw an arc. Start a line; pick a start point. Hover over one end of the arc until you get the acquisition marker. Again, don't pick. Move the cursor away from the end of the arc, near to a point along where the arc would be if it were longer, until you track to the arc's extension. Pick a second point to complete the line. The new line ends exactly on the arc's circle.
If you accidentally acquire the wrong point, hover over it again to "unacquire" it. The acquisition marker will disappear. Now you can pick or acquire another point.

Corollary Tip: Before you can use Object Tracking effectively you will need to become proficient at acquiring points.

Tuesday, June 12, 2007

Polar Mode

Are you Orthodox?

Ortho is one of the favorite drawing modes in AutoCAD. Hitting the F8 key, to toggle Ortho on and off, is almost a reflex for most of us. In this tip I'm asking you to unlearn it. There's a better way. Heresy you say?

Polar mode was introduced in AutoCAD 2002. In this heretic's opinion, it does away with the need for Ortho mode. Polar mode is toggled On/Off with the F10 key (or the Polar button on your task bar). By default the four ortho angles are the default polar angles. As you draw or drag, you will snap to these angles as you come near to them, so you can use free angles or polar angles automatically without toggling any mode settings.

In this example image, I'm drawing a line. The first segment was drawn at an arbitrary angle. The second segment will be exactly 0 degrees because Polar mode is active and I'm close to a polar angle. A fine dashed line appears along the polar angle when you're ready to snap to it.The aperture size determines how near you must approach the polar angle before AutoCAD snaps to it. (The APERTURE system variable controls the size of the object snap target box.)

You can also add other polar angles to the traditional four orthogonal angles.

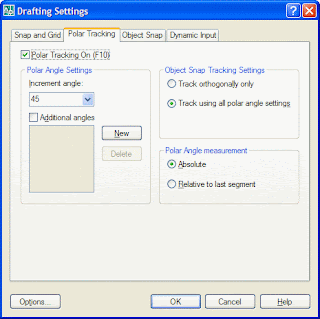
Right-click on the Polar button on your status bar and select Settings... to change your polar angle settings. (Or enter DSETTINGS at the command line and choose the Polar Tracking tab.)

Here you can change the increment angle, even add your own, and tell Polar mode to track using the additional angles.

If you become an adherent of Polar mode, you will eventually find that you're trying to draw a non-constrained line near to a polar angle and AutoCAD is snapping to the polar angle. You can press and hold down the F10 key to override Polar mode for the next pick.

I expect that this tip may prove polarizing, but before you make a pariah of me, give Polar a try and see if you don't become a believer.

Tuesday, June 05, 2007

Match Property Settings

The AutoCAD Match Properties command, MATCHPROP, is an easy way to paint properties from existing objects onto other objects. Simply select the source object and its properties are applied to the target objects.

By default target objects take on the Color, Layer, Linetype, Linetype Scale, Lineweight, Thickness, and Plot Style of the source object. Some object types can take on additional properties from like source objects.

  • Dimension objects take on the Dimension Style of source Dimensions
  • Polylines can inherit global width and linetype generation properties from source Plines
  • Text receives the Text Style from source Text
  • Viewports match the On/Off, Display Locking, Scale, Shade Plot, Snap, Grip and UCS Icon visibility of the source Viewport
  • Hatches will become the source Hatch pattern and scale
  • Tables inherit Table Style from source Tables

Additionally, AutoCAD 2008 provides for painting properties from/to Multileaders which get Multileader Styles. And all annotative objects can match the annotative properties of source objects.

If you don't want all the properties from the source object, you can limit the painted properties by changing the Property Settings before selecting target entities.

Command: MATCHPROP
Select source object:
Current active settings: Color Layer Ltype Ltscale ...
Select destination object(s) or [Settings]:

Enter an S (or Settings) at the Select destination objects prompt to get the Settings dialog.

Simply uncheck any property you don't want to apply to the source objects. For example: you want to change the target objects to match the source object's layer, but don't want to affect the linetypes; uncheck the Linetype property. Or, you want to apply the Hatch layer from one Hatch to another, but don't want to change the existing Hatch pattern; uncheck the Hatch box under Special Properties.